AI writing
Use AI writing in the editor with the AI provider set up in WordPress: improve, shorten, translate and write alt text.
On this page
AI writing adds a small AI button to text fields in the editor. With it, you and your editors can improve a text, make it shorter or longer, fix spelling, change the tone, translate it, and write alt text for images.
AI writing uses the AI Client built into WordPress 7.0 and newer. You choose the AI provider and add its key once, in WordPress under Settings → Connectors. Urmi has no key fields and stores no AI keys. You pay the provider directly for what you use.
This is separate from connecting an AI assistant over MCP, which needs no key in WordPress. See AI & MCP overview.
Set it up
You need WordPress 7.0 or newer.
Set up a provider in WordPress
Go to Settings → Connectors. Set up a provider that can write text, for example Anthropic, Google or OpenAI, and add its API key there.
Open the AI writing tab
Go to Urmi → AI & MCP → AI writing. In the AI provider card, Writing text shows Ready.
Turn on AI actions
In the AI writing in the editor card, turn on AI actions in the editor.
Save
Click Save changes in the bar at the bottom of the screen.
The AI provider card shows what the provider set up in WordPress can do:
| Row | What it means |
|---|---|
| WordPress AI Client | Available on WordPress 7.0 and newer. Needs WordPress 7.0 on older versions. Turned off when AI is switched off in WordPress for this site. |
| Writing text | Needed for the AI actions on text fields. |
| Reading images | Needed for Write alt text with AI. |
| Creating images | Needed for AI images. |
Each row says Ready or No provider set up. Click Open Settings → Connectors to change the provider.
To switch AI writing off, turn off AI actions in the editor and save. The AI buttons disappear from the editor.
Use AI writing in the editor
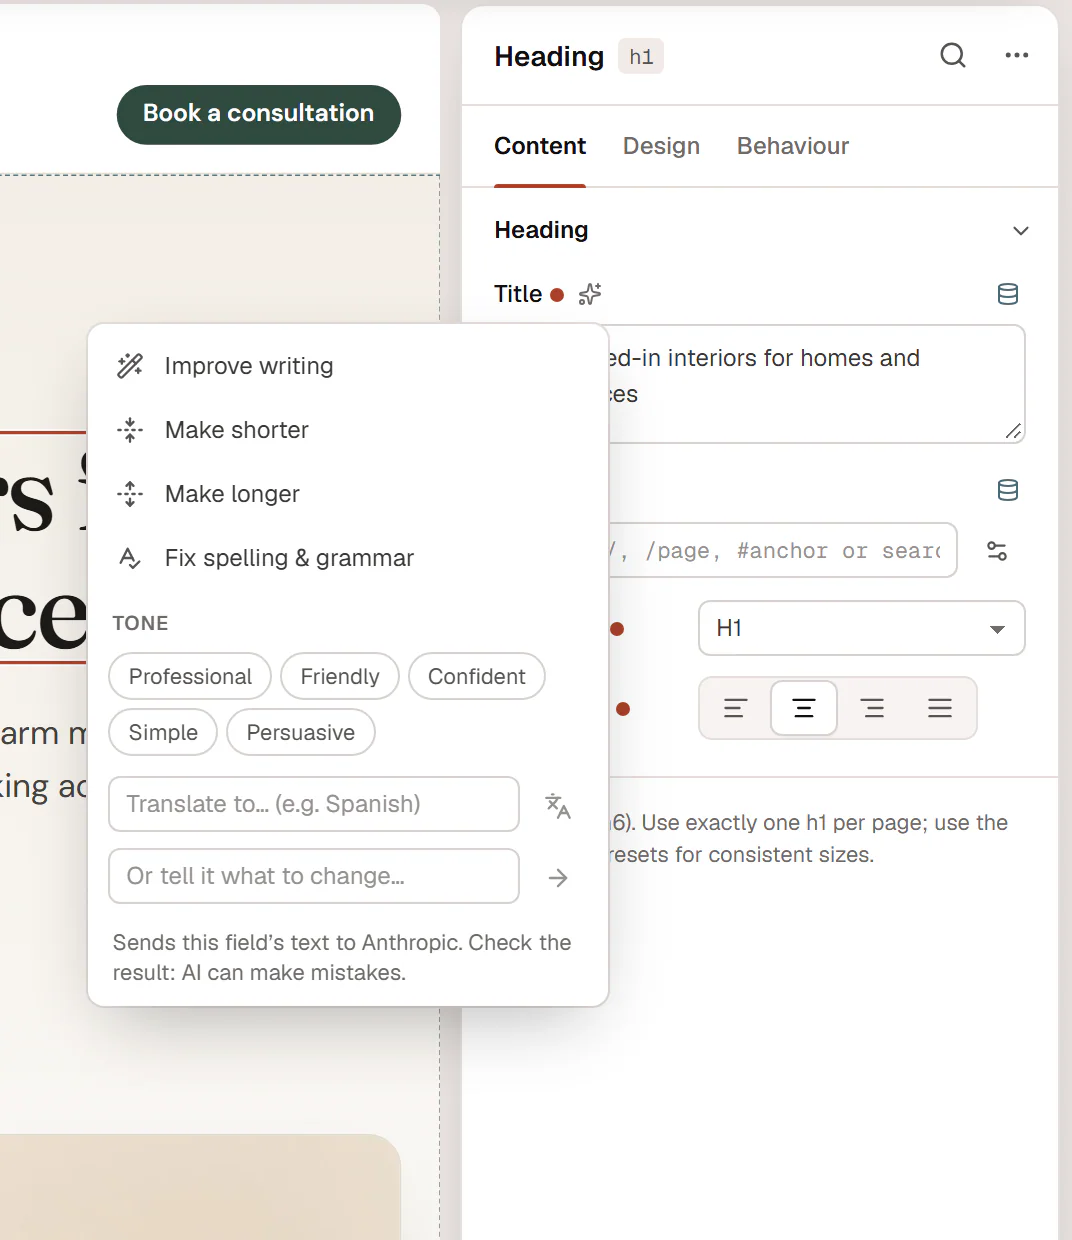
In the editor, select an element and look at its Content tab. Text fields get a small sparkle button next to their label. Click it to open the AI writing menu:
| Action | What it does |
|---|---|
| Improve writing | Makes the text clearer and more engaging, at about the same length and with the same meaning. |
| Make shorter | Cuts the text to about half, keeping the key message. |
| Make longer | Expands on what the text already says, without inventing facts, prices or claims. |
| Fix spelling & grammar | Corrects spelling, grammar and punctuation only. |
| Tone | Rewrites the text as professional, friendly, confident, simple or persuasive. |
| Translate to… | Type a language, such as Spanish, and press Enter. Names, brands and links stay as they are. |
| Or tell it what to change… | Type your own instruction, such as "mention free parking", and press Enter. |
The result replaces the field's text right away. If you do not like it, press Ctrl+Z (⌘+Z on a Mac) to undo.
Fields for technical values, such as links, IDs, CSS classes and code, have no AI button.
If no provider can write text yet, or the site runs a WordPress version before 7.0, the menu shows a short note that explains why instead of the actions. Administrators also get a link to Settings → Connectors.
Write alt text for images
Image fields get a Write alt text with AI button. Urmi passes the chosen image to the AI Client in WordPress and saves the answer as the image's alt text in the media library, so every place that uses the image gets it. The alt text is written in your site's language. If the image looks purely decorative, the alt text stays empty.
This needs a provider that can read images (Reading images shows Ready). It works for JPEG, PNG, GIF and WebP images from the media library, up to 4 MB.
See AI in the editor for more on working with the AI buttons.
Who can use it
Everyone who can edit with Urmi sees the AI buttons once AI actions in the editor is on, unless their role has No access in Roles & access. Writing alt text also needs permission to upload files. Only administrators can change the settings on the AI writing tab and in Settings → Connectors.
Limits and privacy
- What is sent: only the text of the field you work on, or the one image you chose, and only when someone clicks an AI action. Nothing is sent in the background.
- Where it goes: from your server to the provider set up in WordPress under Settings → Connectors. That provider's terms apply.
- Length: up to 12,000 characters per request.
- Rate: each user can make 40 AI writing requests in 10 minutes. After that, the editor asks to wait a few minutes.
If a request fails, the editor shows why. "The AI provider refused the request" usually means the key in Settings → Connectors is wrong or was revoked. "The AI service returned an error" often means the provider account has no credit left. "The AI service is busy" goes away if you try again a moment later.